
In this article, we’re going to cover 2 main subjects of the networking domain for the Docker Certified Associate DCA certification.
- Describe and demonstrate how to deploy a service on a Docker overlay network.
- Compare and contrast “host” and “ingress” publishing modes.
Table of content
- Describe and demonstrate how to deploy a service on a Docker overlay network
- Understand basic concepts related to Docker Swarm
- Using Play with Docker (PWD) to generate a Swarm
- Deploying a Service on a Multi-Host cluster
- Understanding the Swarm Routing Mesh
- Why use is Overlay Network?
- Compare and contrast “host” and “ingress” publishing modes.
- Ingress Mode Service Publishing
- Host Mode Service Publishing
Understand basic concepts related to Docker Swarm
To move on to multi-host networking, we need to make sure we understand a few concepts related to Docker Swarm.
First, Docker Swarm is an orchestrator that makes sure all our containerized application services play together nicely and contribute harmoniously to a common goal.
Swarm never creates individual containers. Instead, all Swarm workloads are scheduled as services, which are scalable groups of containers with added networking features maintained automatically by Swarm.
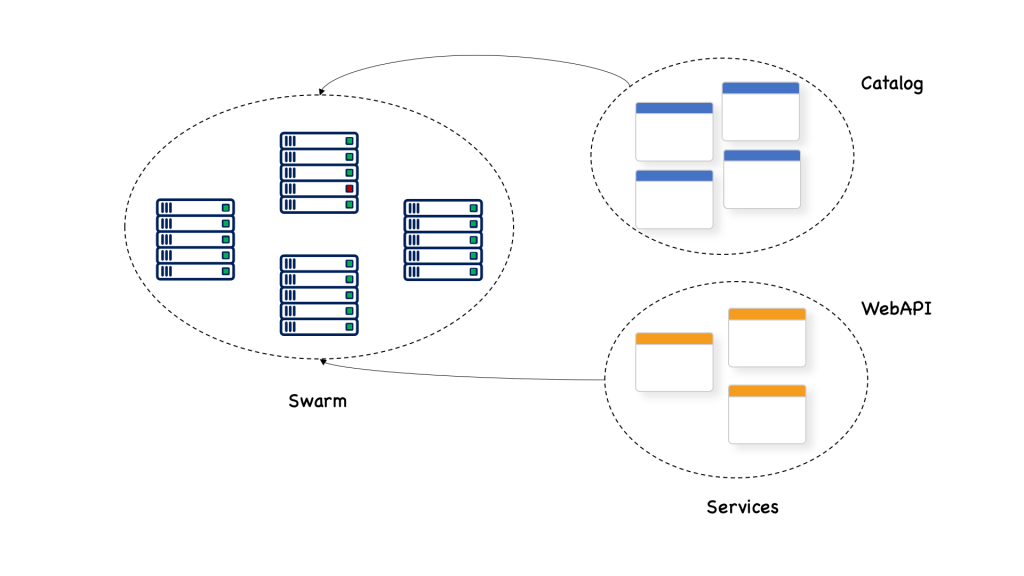
Here, we see that a service named webAPI and a service named catalog are both deployed to a swarm that consists of many nodes. Each of the services has a certain number of replicas; 3 for webAPI and 4 for catalog.
Using Play with Docker (PWD) to generate a Swarm
To experiment with Docker Swarm without having to install or configure anything locally on our computer, we can use Play with Docker.
PWD is a website that can be accessed with a browser and which offers us the ability to create a Docker Swarm that consist of up to five nodes.
Basically, it is a playground with a fully functional Docker environment, that is ideal to demonstrate some features.
Although the time for which we can use it is limited to 4 hours per session, we can open as many sessions as we want, but each session automatically ends after 4 hours.
To access the site go to https://labs.play-with-docker.com. You will be presented with a welcome and login screen. Use your Docker ID to log in.
There are already some templates defined. I’m going to use one template to create a swarm with 3 managers and 2 workers.
Deploying a Service on a Multi-Host cluster
A service can be created either as part of a stack or directly using the Docker CLI. Still, it’s recommended that all Swarm objects to be described in text files called stacks.
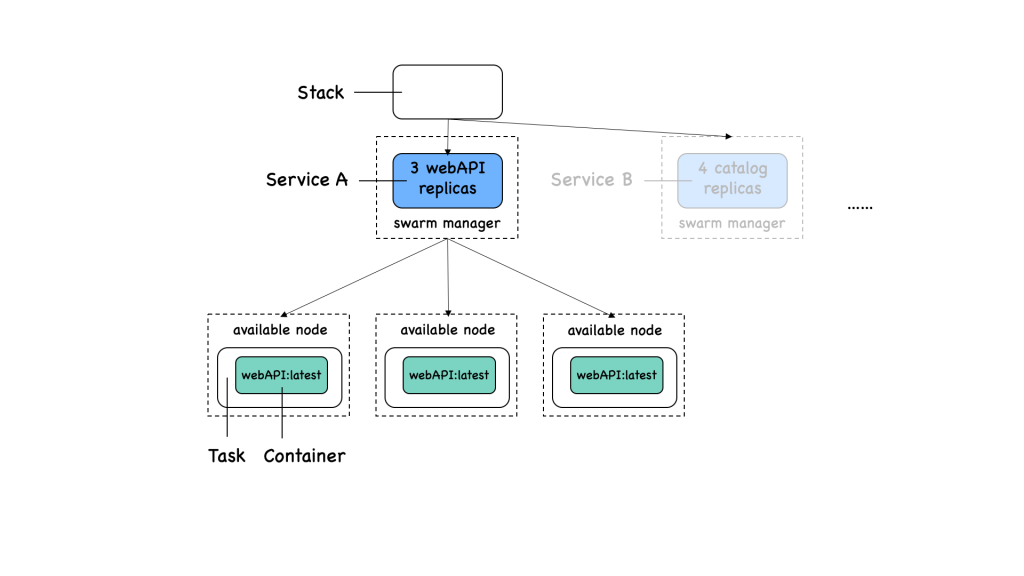
A stack is used to define a collection of services that are related, most probably because they are part of the same application. In turn, each service has a collection of tasks.
These stack YAML files describe all the components and configurations of your Swarm app, and can be used to easily create and destroy your app in any Swarm environment.
To begin, make sure you are on one of the manager nodes. Then create a file called web-stack.yaml and open the vi editor:
touch web-stack.yaml
vi web-stack.yaml
Place the following in the file and then enter “:x” to save the file.
version: "3.8"

services:
  webAPI:
    image: nginx
    ports:
        - '8080:80'
    deploy:
      replicas: 2
In this example we see what’s the desired state of a service called webAPI:
- It is based on the image nginx:latest
- The container port 80 is published to port 8080
- It is running with 2 replicas (or tasks in docker swarm language)
To create the preceding service, we use the docker stack deploy command.
docker stack deploy -c web-stack.yaml sample-appA default network was created for us, together with a stack called sample-app that consists of one service, webAPI. If we list the services defined in our swarm, we get the following output:
docker service ls

ID                  NAME                MODE                REPLICAS            IMAGE               PORTS
1gt2w6t67zrs        sample-app_webAPI   replicated          2/2                 nginx:latest        *:8080->80/tcp
Furthermore, we can see the list of the 2 tasks that correspond to the requested 2 replicas of our webAPI service by issuing the following command:
docker service ps sample-app_webAPIIn the NODE column, we can also see the node to which each task has been deployed. The corresponding tasks have been scheduled on worker2 node and manager3 node. More specifically, task 1, sample-app_webAPI.1, landed on host worker2 while task 2, sample-app_webAPI.2, landed on host manager3.
Understanding the Swarm Routing Mesh
The webAPI service has been deployed and it resulted in the fact that an instance of the service web was installed on two nodes worker2 and manager3.
You can expose this service externally by using the –publish flag when creating or updating the service. Publishing ports in Docker Swarm mode means that every node in your cluster is listening on that port. But what happens if the service’s task isn’t on the node that is listening on that port?
Let’s test the application using curl from the manager node 1.
docker@manager1: curl localhost:8080And, indeed, the application works as expected. Yet, we were able to access the web service on manager 1 with localhost. But the application was deployed on worker 2 and manager 3. How is that possible?
Well, this is due to the so-called swarm routing mesh.
The routing mesh makes sure that when we publish a port of a service, that port is then published on all nodes of the swarm.
Thus, network traffic, internal or external, that hits any node of the swarm and requests to use the specific port, will be forwarded by routing the mesh, to one of the nodes that contain the containers of the service. Let’s see how that works.
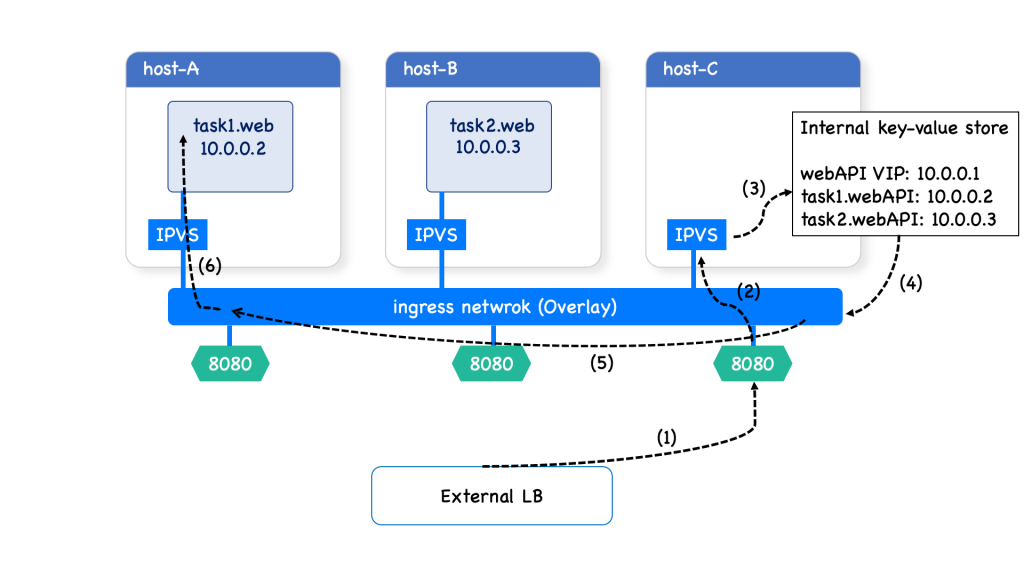
Consider that we have three nodes, called host A, host b, and host C.
Previously, we created a service web with two replicas. The corresponding tasks have been scheduled on Host A and Host B. More specifically, task 1 landed on host A while task 2 landed on host B.
Now, the routing mesh exposes port 8080 on each host in the cluster. To be able to publish a service port, Docker Swarm has to combine several sophisticated network building blocks as we’ll see. Returning to our example:
First, a request comes from a client and it goes through an external load balancer (LB) and it wants to reach port 8080. (1)
This traffic destined for the service webAPI can enter on any host. (2)
In this case, the external LB sends the traffic to a host without a service replica. Since this host can serve the request it has to redirect the request.
To achieve this, Swarm uses a Linux component, called IP Virtual Server load balancer (IPVS), which redirects traffic on the ingress overlay network to find a healthy service replica.
And now begins the service discovery process. (3)
Docker uses embedded DNS to provide service discovery for tasks(containers) running in a Docker Swarm.
This internal DNS server that provides name resolution to all of the containers on an overlay network.
When a request comes for a service, Docker Engine looks up the IP address that matches a task name, or service’s name in its key-value store and returns that service Virtual IP (VIP) back to the requester.
These VIPs are automatically assigned when services are created in a Docker Swarm cluster, and they are attached to the ingress network. (4)
This approach avoids any application-level load balancing because only a single IP is returned to the client. Docker takes care of routing and equally distributing the traffic across the healthy service tasks. (5)
Therefore, the virtual IP of that service is load-balanced by the operating system network stack to the individual task IP addresses. In our case, it picked task 2, with the IP address 10.0.0.2. (6)

To recap. When traffic reaches a cluster node on port 8080, Docker Swarm reroutes that traffic to the service VIP attached to the ingress network.
Then, IPVS forwards traffic from the VIP to the real endpoints, which are Docker service tasks.
What’s important to note here is that it doesn’t matter which swarm node the external request is forwarded to by the external LB. The routing mesh will always handle the request correctly and forward it to one of the tasks of the targeted service.
Why use is Overlay Network?
In short, the overlay network allows containers attached to the same overlay network to discover each other and freely communicate with each other.
The overlay network driver creates a distributed network among multiple Docker daemon hosts. This network sits on top of (overlays) the host-specific networks, allowing containers connected to it (including swarm service containers) to communicate securely when encryption is enabled. Docker transparently handles routing of each packet to and from the correct Docker daemon host and the correct destination container.
Compare and contrast “host” and “ingress” publishing modes.
Now, that we understood how network port publishing works on a multi-host network, we are ready to compare the “host” vs “ingress” publishing modes.
Ingress (traffic originated from outside) and egress (traffic from inside to outside) for services do not depend on centralized gateways but distributed ingress/egress on the host where the specific service task is running. There are two modes of port publishing for services, host mode, and ingress mode.
Ingress Mode Service Publishing
Ingress mode port publishing utilizes the Swarm Routing Mesh to apply load balancing across the tasks in a service. Ingress mode publishes the exposed port on every UCP/Swarm node.
Ingress traffic to the published port is load-balanced by the Routing Mesh and directed via round-robin load balancing to one of the healthy tasks of the service.
Even if a given host is not running a service task, the port is published on the host and is load balanced to a host that has a task.
docker service create --replicas 2 --publish mode=ingress,target=80,published=8080 nginxmode=ingress is the default mode for services. This command can also be written with the shorthand version -p 80:8080. Port 8080 is exposed on every host on the cluster and load balanced to the two containers in this service.
Publishing a port establishes a stable ingress point for a Docker service that is independent of the transient locations of that service’s tasks within the Swarm cluster.
Therefore, in this mode, you can rely on the routing mesh. When you publish a service port, the swarm makes the service accessible at the target port on every node, regardless of whether there is a task for the service running on that node or not. This is less complex and is the right choice for many types of services.
Host Mode Service Publishing
An alternate publishing mode, called host, bypasses the routing mesh. When using this mode, clients connect directly to the service task on a given host. If a task is deployed there, it can handle the connection; otherwise, the connection attempt will fail.
It does not apply load balancing, so traffic to those nodes are directed only to the local container.
docker service create --replicas 2 –publish mode=host,target=80,published=8080 nginxTo prevent port collision only a single task of a given service can run on each host.
Therefore, you can publish a service task’s port directly on the swarm node where that service is running. This bypasses the routing mesh and provides the maximum flexibility, including the ability for you to develop your own routing framework. However, you are responsible for keeping track of where each task is running and routing requests to the tasks, and load-balancing across the nodes.